개요
이 기사에서는 캐릭터를 지면의 경사에 맞춰 기울이는 처리를 C++로 구현하는 방법을 소개합니다.
Blueprint로 구현하고 싶은 분은 다음 기사를 참고하시기 바랍니다.
UE4 지면의 경사에 맞춰 캐릭터를 기울이는 방법
환경
- Rider 2024.2.6
- Unreal Engine 5.4
참고 자료
- https://www.youtube.com/watch?v=1ICBWJ7srxQ
- UE4 지면의 기울기에 맞춰 캐릭터를 기울이기
- 벡터 외적: https://ko.wikipedia.org/wiki/%EC%99%B8%EC%A0%81_(%EB%B2%A1%ED%84%B0_%EC%97%B0%EC%82%B0)
- 벡터 내적: https://ko.wikipedia.org/wiki/%EB%82%B4%EC%A0%81_(%EB%B2%A1%ED%84%B0_%EC%97%B0%EC%82%B0)
- 롤, 피치, 요
본편
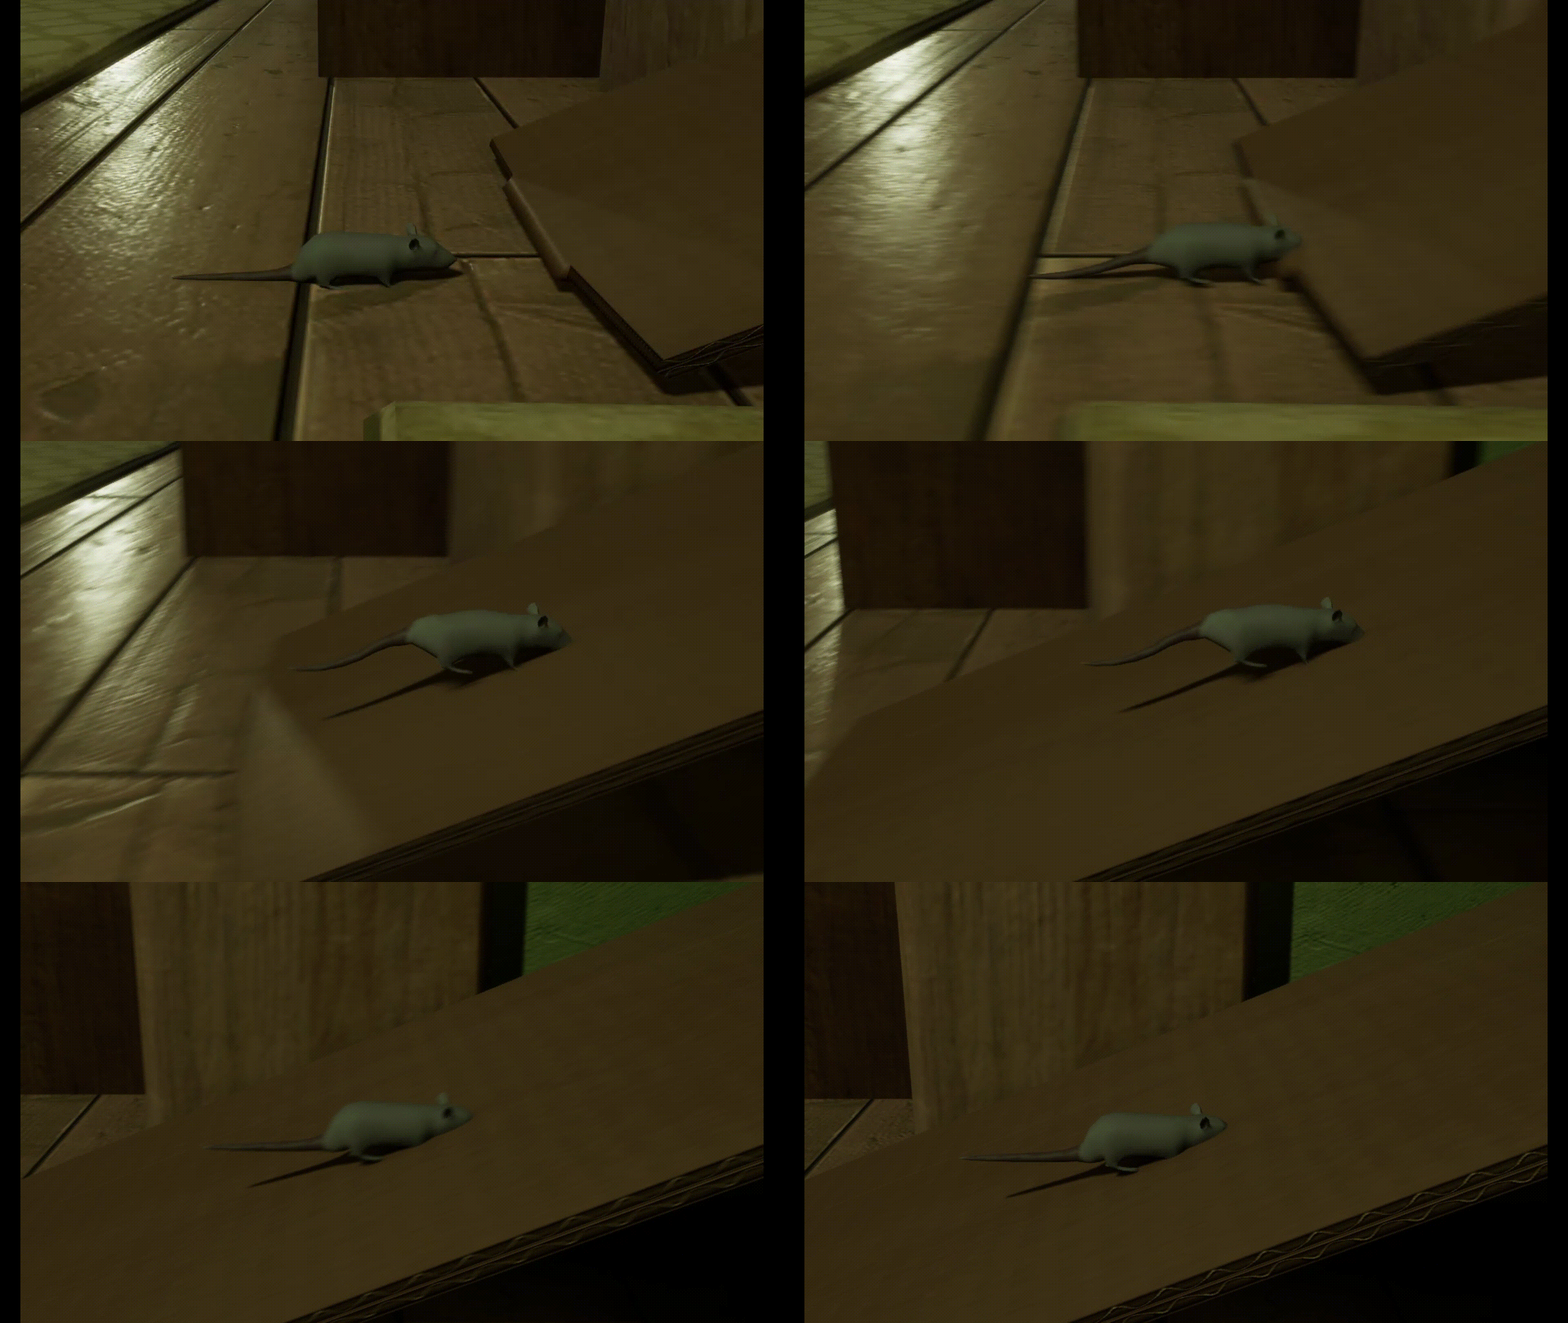
캐릭터가 경사진 면을 걸을 때 기울기를 맞추지 않으면 이렇게 됩니다.

캐릭터의 머리가 경사면에 파묻혀서 부자연스럽게 보입니다.
그럼 C++로 구현해보겠습니다.
절차는 다음과 같습니다.
- 캐릭터의 바로 아래를 향해 레이캐스트(선형 판별)를 수행합니다.
- 레이캐스트가 지면(경사면)에 닿으면 지면(경사면)의 법선을 가져옵니다.
- 가져온 법선을 이용해 지면(경사면)의 기울기를 계산합니다.
- 지면(경사면)의 기울기에 따라 캐릭터를 회전시킵니다.
플레이어 클래스에 AlignFloor() 함수를 구현하기
AlignFloor()는 타이머로 0.1초마다 호출됩니다(틱에서 호출할 수도 있지만 최적화를 고려하여 0.1초로 설정합니다. 시각적으로는 0.1초 주기로는 이질감이 없을 것 같습니다).
PlayerCharacter.h1private:
2	void AlignFloor() const;
3
4	FTimerHandle AlignFloorTimerHandle;
PlayerCharacter.cpp1
2void APlayerCharacter::BeginPlay()
3{
4	Super::BeginPlay();
5
6	GetWorldTimerManager().SetTimer(AlignFloorTimerHandle, this, &APlayerCharacter::AlignFloor, 0.1f, true);
7}
8
9void APlayerCharacter::AlignFloor() const
10{
11	const FVector MeshLocation = GetMesh()->GetComponentLocation() + 1.f * FVector::UpVector;
12	const FVector MeshDownLocation = MeshLocation - 1000.f * FVector::UpVector;
13	FHitResult HitResult;
14	FCollisionQueryParams CollisionQueryParams;
15	CollisionQueryParams.AddIgnoredActor(this);
16	const bool IsHit = GetWorld()->LineTraceSingleByChannel(HitResult, MeshLocation, MeshDownLocation, ECC_WorldStatic,
17	                                                        CollisionQueryParams);
18	if (IsHit)
19	{
20		FVector FloorNormal = HitResult.ImpactNormal;
21		FVector RightVector = GetActorRightVector();
22		FVector UpVector = GetActorUpVector();
23		float SlopePitch;
24		float SlopeRoll;
25		UKismetMathLibrary::GetSlopeDegreeAngles(RightVector, FloorNormal, UpVector, SlopePitch, SlopeRoll);
26		SlopePitch = -SlopePitch;
27		const float MeshYaw = GetMesh()->GetComponentRotation().Yaw;
28		const float MeshPitch = GetMesh()->GetComponentRotation().Pitch;
29		const FRotator FloorRotation = FRotator(MeshPitch, MeshYaw, SlopePitch);
30		GetMesh()->SetWorldRotation(FloorRotation);
31	}
32}
이로써 지면의 경사에 맞춰 캐릭터를 기울이는 구현이 완료되었습니다!
해설
캐릭터의 바로 아래를 향해 레이캐스트를 수행합니다.
PlayerCharacter.cpp1void APlayerCharacter::AlignFloor() const
2{
3	const FVector MeshLocation = GetMesh()->GetComponentLocation() + 1.f * FVector::UpVector;
4	const FVector MeshDownLocation = MeshLocation - 1000.f * FVector::UpVector;
5	FHitResult HitResult;
6	FCollisionQueryParams CollisionQueryParams;
7	CollisionQueryParams.AddIgnoredActor(this);
8	const bool IsHit = GetWorld()->LineTraceSingleByChannel(HitResult, MeshLocation, MeshDownLocation, ECC_WorldStatic,
9	                                                        CollisionQueryParams);
10	if (IsHit)
11	{
12		FVector FloorNormal = HitResult.ImpactNormal;
13		FVector RightVector = GetActorRightVector();
14		FVector UpVector = GetActorUpVector();
15		float SlopePitch;
16		float SlopeRoll;
17		UKismetMathLibrary::GetSlopeDegreeAngles(RightVector, FloorNormal, UpVector, SlopePitch, SlopeRoll);
18		SlopePitch = -SlopePitch;
19		const float MeshYaw = GetMesh()->GetComponentRotation().Yaw;
20		const float MeshPitch = GetMesh()->GetComponentRotation().Pitch;
21		const FRotator FloorRotation = FRotator(MeshPitch, MeshYaw, SlopePitch);
22		GetMesh()->SetWorldRotation(FloorRotation);
23	}
24}
이 부분에서는 캐릭터의 약간 위쪽에서 바로 아래를 향해 레이캐스트 판정을 수행하고 있습니다.
const FVector MeshLocation = GetMesh()->GetComponentLocation() + 1.f * FVector::UpVector;
+ 1.f는 지면과의 거리를 확보하기 위한 것입니다. 그렇지 않으면 캐릭터가 지면과 같은 높이에 위치하게 되어 레이캐스트가 지면에 올바르게 닿지 않을 수 있습니다(실제로 제 환경에서도 발생했습니다).
레이캐스트가 지면에 닿으면 지면의 법선(FloorNormal)을 가져옵니다.
가져온 법선을 이용해 지면의 기울기를 계산합니다.
PlayerCharacter.cpp1void APlayerCharacter::AlignFloor() const
2{
3	const FVector MeshLocation = GetMesh()->GetComponentLocation() + 1.f * FVector::UpVector;
4	const FVector MeshDownLocation = MeshLocation - 1000.f * FVector::UpVector;
5	FHitResult HitResult;
6	FCollisionQueryParams CollisionQueryParams;
7	CollisionQueryParams.AddIgnoredActor(this);
8	const bool IsHit = GetWorld()->LineTraceSingleByChannel(HitResult, MeshLocation, MeshDownLocation, ECC_WorldStatic,
9	                                                        CollisionQueryParams);
10	if (IsHit)
11	{
12		FVector FloorNormal = HitResult.ImpactNormal;
13		FVector RightVector = GetActorRightVector();
14		FVector UpVector = GetActorUpVector();
15		float SlopePitch;
16		float SlopeRoll;
17		UKismetMathLibrary::GetSlopeDegreeAngles(RightVector, FloorNormal, UpVector, SlopePitch, SlopeRoll);
18		SlopePitch = -SlopePitch;
19		const float MeshYaw = GetMesh()->GetComponentRotation().Yaw;
20		const float MeshPitch = GetMesh()->GetComponentRotation().Pitch;
21		const FRotator FloorRotation = FRotator(MeshPitch, MeshYaw, SlopePitch);
22		GetMesh()->SetWorldRotation(FloorRotation);
23	}
24}
이 수식의 세부사항에 대해 설명하면 약간 수학적인 내용이 포함되므로, 관심 있는 분만 읽어주시기 바랍니다. 관심이 없는 분은 다음으로 넘어가 주세요.
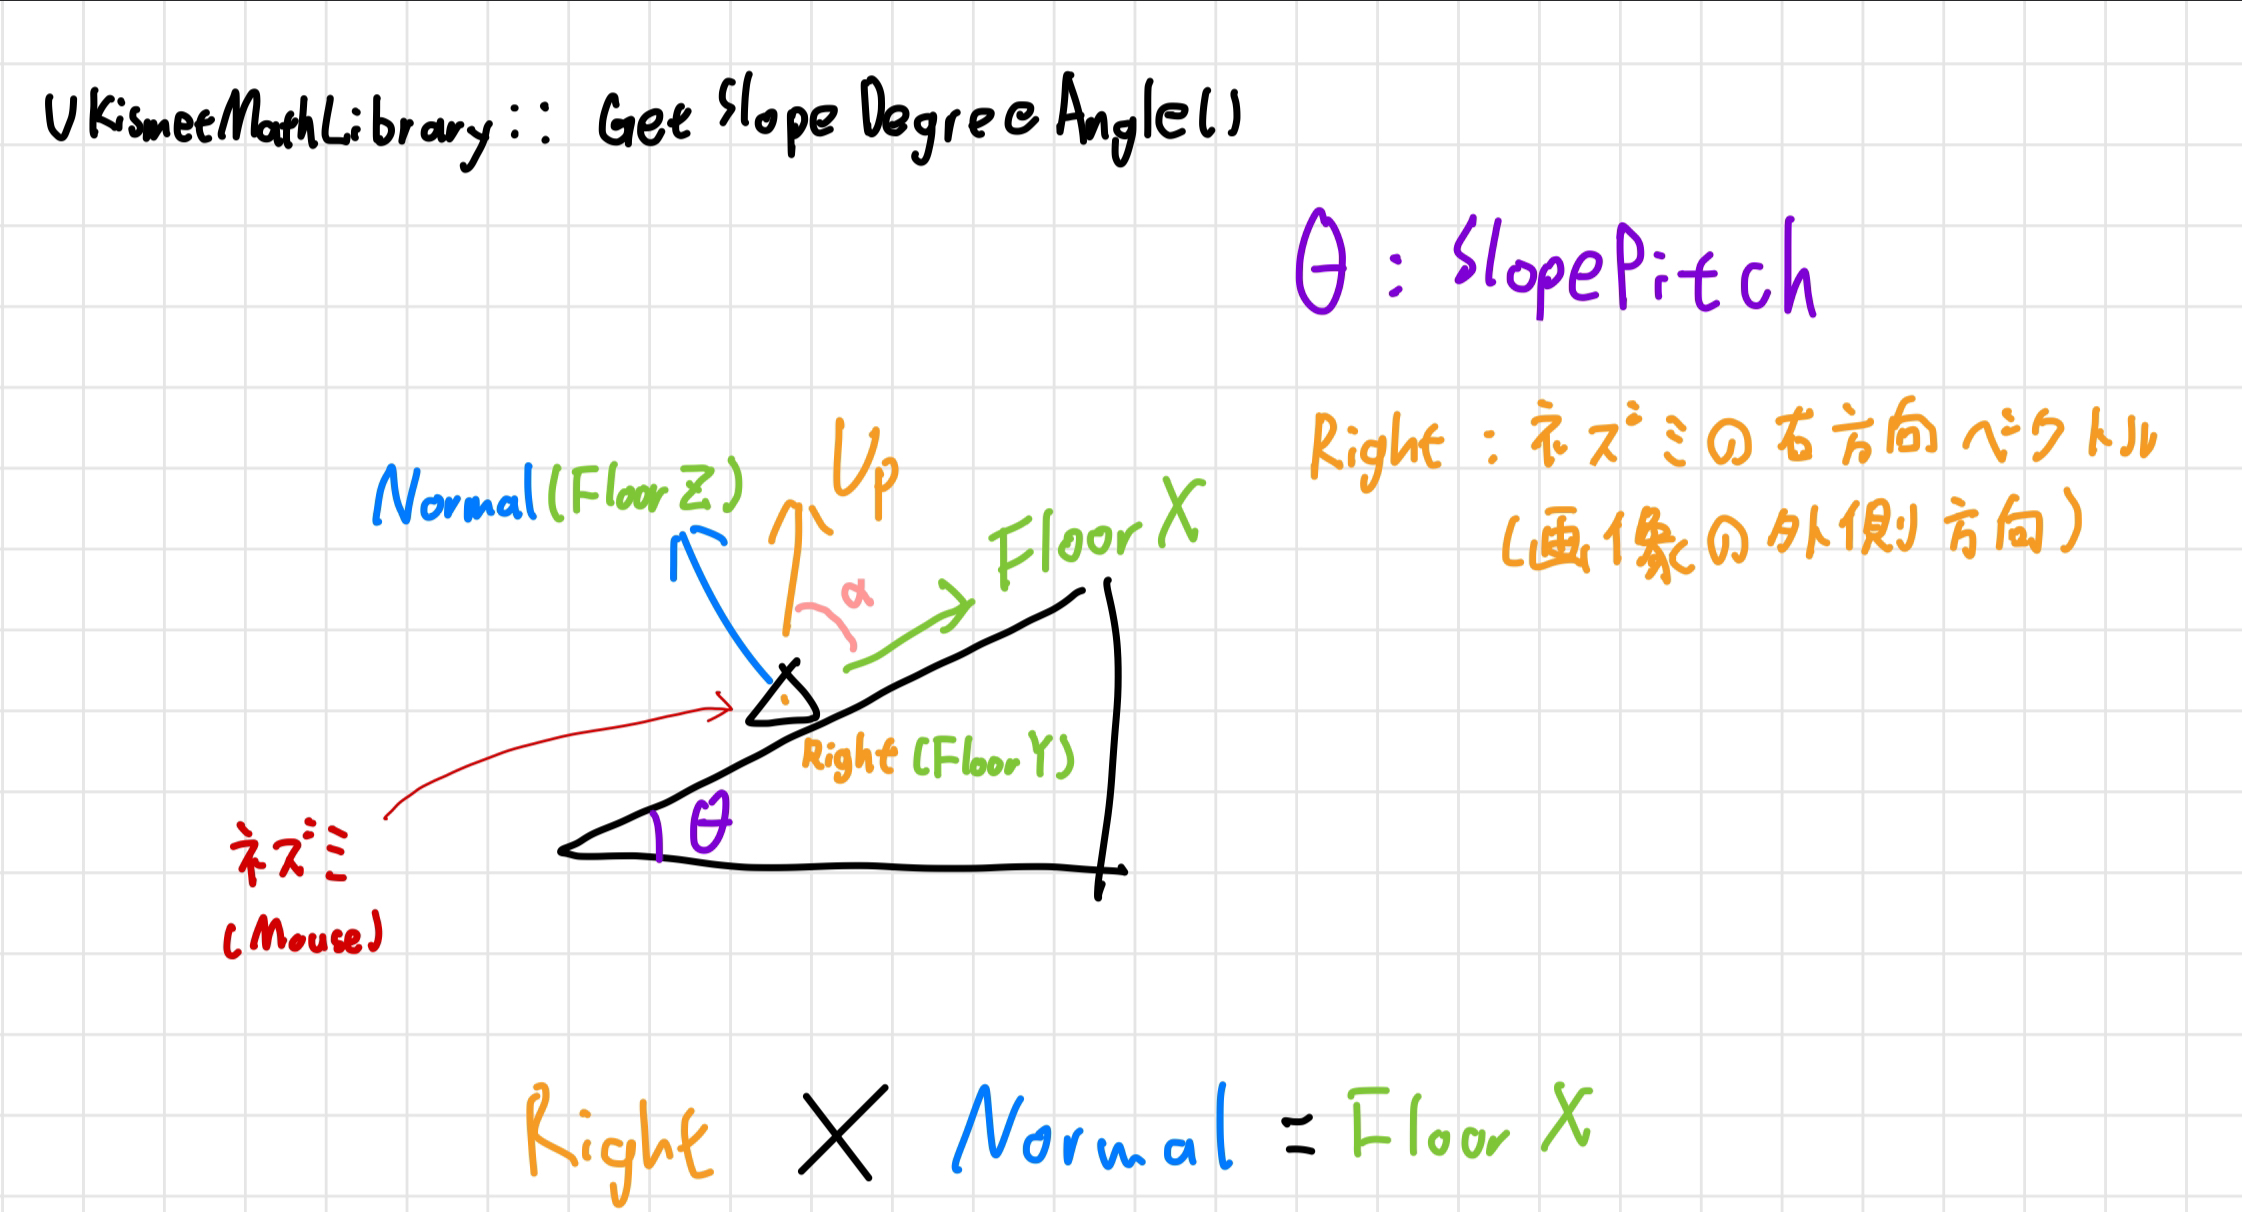
캐릭터가 쥐라고 가정하고, 쥐가 경사면에 서 있는 상황을 생각해봅시다. 레이캐스트가 경사면에 닿고 그 법선을 가져옵니다.
지면(경사면)의 법선을 가져오기
FVector FloorNormal = HitResult.ImpactNormal;
법선이란?
곡면 위의 한 점에서 그 점의 접평면에 수직인 직선
경사 각도 계산
캐릭터의 오른쪽 방향 벡터와 위쪽 방향 벡터를 가져옵니다.
1		//...
2		FVector RightVector = GetActorRightVector();
3		FVector UpVector = GetActorUpVector();
4		//...
UKismetMathLibrary의 함수를 사용하여 경사면의 경사 각도(SlopePitch)를 가져옵니다.
UKismetMathLibrary::GetSlopeDegreeAngles(RightVector, FloorNormal, UpVector, SlopePitch, SlopeRoll);
이 함수의 내부를 확인하면 다음과 같은 계산이 수행됩니다.
KismetMathLibary.cpp1void UKismetMathLibrary::GetSlopeDegreeAngles(const FVector& MyRightYAxis, const FVector& FloorNormal, const FVector& UpVector, float& OutSlopePitchDegreeAngle, float& OutSlopeRollDegreeAngle)
2{
3	const FVector FloorZAxis = FloorNormal;
4	const FVector FloorXAxis = MyRightYAxis ^ FloorZAxis;
5	const FVector FloorYAxis = FloorZAxis ^ FloorXAxis;
6
7	OutSlopePitchDegreeAngle = 90.f - FMath::RadiansToDegrees(FMath::Acos(FloorXAxis | UpVector));
8	OutSlopeRollDegreeAngle = 90.f - FMath::RadiansToDegrees(FMath::Acos(FloorYAxis | UpVector));
9}
그림을 사용하여 설명하면 이해하기 쉬울 수 있습니다.
예를 들어, 쥐가 경사면에 서 있는 모습의 오른쪽 측면도는 아래와 같습니다.

△ 삼각형은 쥐입니다.
FloorZ는 경사면의 법선(법선 벡터)입니다. FloorX는 쥐의 오른쪽 방향 벡터와 FloorZ **(법선 벡터)**의 크로스 곱(Cross Product)으로 계산되어, 그 결과 경사면의 상승 방향 벡터가 됩니다.
FVector에서의 캐럿(Caret)「^」는 크로스 곱 연산자입니다.
두 벡터의 크로스 곱의 결과는 그 벡터에 수직인 벡터입니다.
크로스 곱에 대한 자세한 내용은: https://ja.wikipedia.org/wiki/%E3%82%AF%E3%83%AD%E3%82%B9%E7%A9%8D
다음으로, FloorZ와 FloorX의 크로스 곱을 계산하면 "쥐의 오른쪽 방향 벡터"가 얻어집니다.
const FVector FloorYAxis = FloorZAxis ^ FloorXAxis;
경사면의 상승 방향 벡터(FloorX)와 쥐의 위쪽 방향 벡터(Up)의 도트 곱(Dot Product)을 계산하고, 그 결과에서 Acos를 취하면 각도 a를 구할 수 있습니다. 90도에서 그 각도를 빼면 경사면의 경사 각도(SlopePitch)를 얻을 수 있습니다.
OutSlopePitchDegreeAngle = 90.f - FMath::RadiansToDegrees(FMath::Acos(FloorXAxis | UpVector));
FVector의「|」는 도트 곱 연산자입니다.
도트 곱에 대한 자세한 내용은: https://ja.wikipedia.org/wiki/%E3%83%89%E3%83%83%E3%83%88%E7%A9%8D
지면의 경사량에 따라 캐릭터를 회전시킵니다.
PlayerCharacter.cpp1void APlayerCharacter::AlignFloor() const
2{
3	const FVector MeshLocation = GetMesh()->GetComponentLocation() + 1.f * FVector::UpVector;
4	const FVector MeshDownLocation = MeshLocation - 1000.f * FVector::UpVector;
5	FHitResult HitResult;
6	FCollisionQueryParams CollisionQueryParams;
7	CollisionQueryParams.AddIgnoredActor(this);
8	const bool IsHit = GetWorld()->LineTraceSingleByChannel(HitResult, MeshLocation, MeshDownLocation, ECC_WorldStatic,
9	                                                        CollisionQueryParams);
10	if (IsHit)
11	{
12		FVector FloorNormal = HitResult.ImpactNormal;
13		FVector RightVector = GetActorRightVector();
14		FVector UpVector = GetActorUpVector();
15		float SlopePitch;
16		float SlopeRoll;
17		UKismetMathLibrary::GetSlopeDegreeAngles(RightVector, FloorNormal, UpVector, SlopePitch, SlopeRoll);
18		SlopePitch = -SlopePitch;
19		const float MeshYaw = GetMesh()->GetComponentRotation().Yaw;
20		const float MeshPitch = GetMesh()->GetComponentRotation().Pitch;
21		const FRotator FloorRotation = FRotator(MeshPitch, MeshYaw, SlopePitch);
22		GetMesh()->SetWorldRotation(FloorRotation);
23	}
24}
쥐의 메쉬 롤(Roll)을 반대 방향으로 회전시켜 경사면의 기울기에 자연스럽게 반응하도록 캐릭터가 회전합니다.
결과
캐릭터가 올바르게 경사면에 반응하여 작동하는 모습을 아래의 데모에서 확인할 수 있습니다.
마지막으로
이 기사에서는 캐릭터를 지면의 경사에 맞춰 회전시키는 방법을 설명했습니다. 만약 오류가 있다면, 꼭 댓글로 알려주세요.